Install the Portico SDK
📦 Prerequisites
Before you begin, ensure you have the following:
- Unity: Version 2019.4+ (LTS recommended)
- PorticoXR Account: A valid developer account
- C# Knowledge: Basic familiarity with Unity’s scripting workflow
- Internet Connection: Required for package installation and authentication
🔧 Installing the Portico SDK
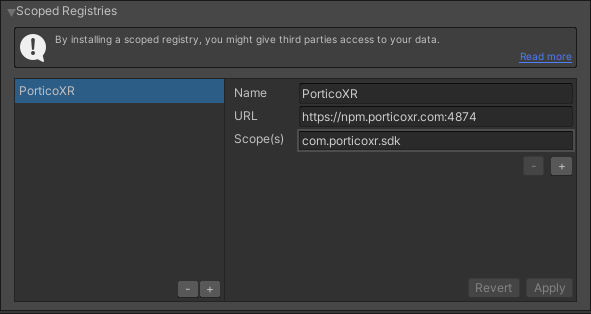
Step 1: Add the Scoped Registry
To access PorticoXR packages in your Unity project, you need to add a scoped registry via the Unity Package Manager:
- Open Unity and navigate to Edit > Project Settings > Package Manager
- Under Scoped Registries, click the + button to add a new registry if required
- Configure the registry with these details:
- Name:
PorticoXR - URL:
https://npm.porticoxr.com:4874 - Scopes:
com.porticoxr.sdk
- Name:
- Click Save
Step 2: Install the Core Package
- Open the Package Manager window (Window > Package Manager)
- Select My Registries from the dropdown menu
- Find and install the
PorticoXR Corepackage - Wait for the installation to complete
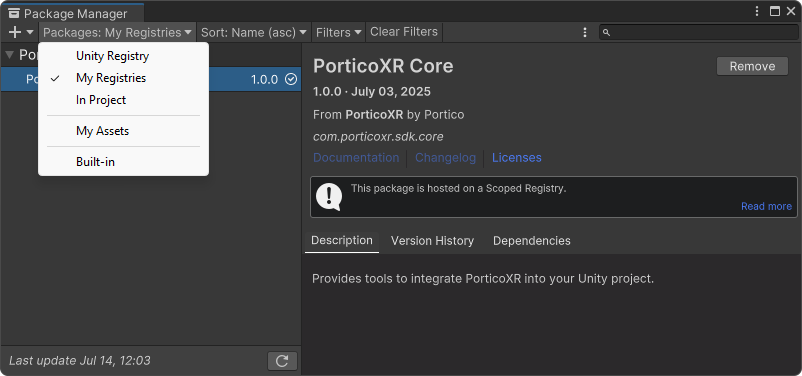
💡 If the registry doesn’t appear, try closing and reopening the Package Manager window or restarting Unity.
🔑 Developer Key
You should have received your developer key via email. If you have not received it, please contact our support team at dev-support@porticoxr.com.
- Open the PorticoXR window in Unity.
- Paste your developer key into the input field.
- Click Submit to authenticate.
Once submitted, your developer key will automatically authenticate your device each time you open the Unity Editor.
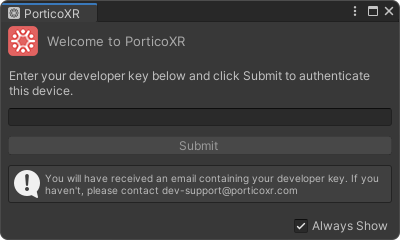
🚮 To remove your key: Open the PorticoXR window’s context menu and select Remove Developer Key.
🛠 Initialize Portico
To connect your application to Portico, you need to call the Initialize method. This should be done early in your application lifecycle to accurately track session duration.
When your application is launched through the Portico LMS App, the authentication information and user identity will be picked up by the SDK at this point.
ℹ️ As mentioned in the Portico LMS Overview, if your application is launched outside of Portico, this method won’t do anything, and your application will function normally.
using PorticoXR;

private void Start()
{
    // Initialize PorticoXR when your application starts
    Portico.Initialize();
}
✅ Validate Your Session
If you wish to ensure your session is authenticated successfully, there are few options:
- Subscribe to the
Portico.OnInitializedevent
using PorticoXR;

private void Start()
{
    // Subscribe to the event before initialization
    Portico.OnInitialized += HandleInitializationResponse;
    Portico.Initialize();
}

private void HandleInitializationResponse(bool success)
{
    if (success)
    {
        // Authentication succeeded
    }
    else
    {
        // Authentication failed
    }
}- Use the asynchronous
Portico.InitializeAsyncmethod
using PorticoXR;

private async void Start()
{
    // Initialize PorticoXR and wait for authentication result
    bool success = await Portico.InitializeAsync();

    if (success)
    {
        // Authentication succeeded
    }
    else
    {
        // Authentication failed
    }
}
1️⃣ Single Version Deployment
Instead of maintaining a separate ‘Portico’ build of your app, you can use a single unified version that dynamically adapts based on the launch context.
Use the Portico.IsAvailable property to detect whether your app was launched via the Portico App.
true: Initialize the Portico SDK and enable Portico-specific features.false: Proceed with your app’s standard initialization and behavior (no Portico integration).
flowchart TD
A[App Launch] --> B{Portico.IsAvailable?}
B -->|True| C[Initialize Portico SDK]
B -->|False| D[Use default app behavior]
This approach keeps your codebase clean, eliminates redundant builds, and ensures consistent behavior across environments.